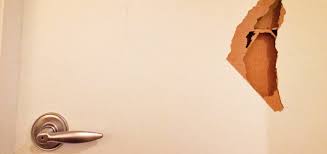
So you’ve got a hole in your wood door, and you’re not sure what to do. Don’t worry fixing holes in wooden doors is easier than you think. Here are some simple steps that will help you repair the damage and make your wood door look as good as new.
Types of Wooden Doors
Slab Doors
Slab doors are the most basic type of wooden door. They are made from a single piece of wood, and they do not have any panels or glass. Slab doors are typically used for closets and other interior rooms where privacy is not a concern.
Panel Doors
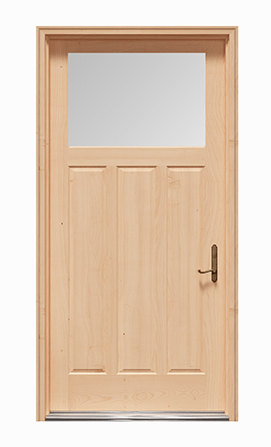
Panel doors are more decorative than slab doors, and they are typically used for entryways and other main rooms in the home. Panel doors have several panels of wood that are held together by stiles and rails. Some panel doors also have glass inserts, which can add to their aesthetic appeal.
Flush Doors
Flush doors are a type of panel door that is made from two pieces of wood that are joined together with adhesive. The wood grain on flush doors runs horizontally, which gives them a sleek, modern look. Flush doors are often used in contemporary homes and office buildings.
Louvered Doors
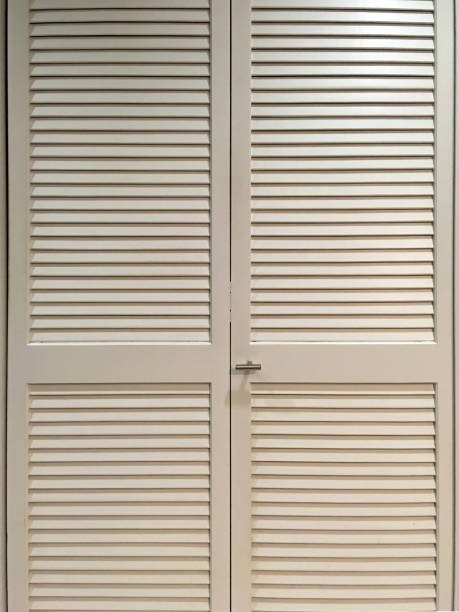
Louvered doors have slats that allow air to flow through them. They are typically used in laundry rooms, pantries, and other areas where ventilation is important.
Why Does a Wooden Door get a Hole?
Wooden doors are susceptible to getting holes for many reasons, ranging from structural wear and tear to pests. Over time, a wooden door can begin to warp due to changes in temperature or even moisture.
This warping causes the wood’s fibers to eventually separate and create a space where insects like termites can start making their home.
Other than that, improper installation of a door could weaken the hinges and cause them to hang at an awkward angle; this uncomfortably applied force on the door may result in holes.
In addition, if screws were used during installation that was too long, it could cause them to pierce through the other side of the door.
Fortunately, most of these issues can be repaired fairly easily with some minor patching or re-enforcement.
Tools and Materials Required
- Hammer
- Nails
- Saw
- Drill
- Screws
- Sandpaper
- Paint
- Wood filler
4 Steps for Fixing a Hole in a Door
1. Clean the Area Around the Hole
Cleaning the area around a hole in a wooden door is crucial for your door’s function and longevity. Before doing anything else, be sure to thoroughly clean the entire area around the hole.
This can be done with a damp rag or sponge. If the area is particularly dirty, use an all-purpose cleaner and scrub it gently until all dirt and debris have been removed.
Another way is to use a soft brush or cloth to dust the area lightly, paying special attention to any caked-on dirt, particles, or cobwebs that may be present in and around the hole.
Then, use soapy hot water and a damp towel-rag to wipe down all surfaces surrounding the hole, as when cleaning wood there should never be anything stronger than soap used on any seam or section.
2. Fill the Hole
Once the area is clean, use a putty knife to fill the hole with wood filler or spackle. Be sure to fill up all gaps so that your patch job looks smooth even when it dries. Allow 24 hours for the filler or spackle to dry completely before moving on to the next step.
3. Sand Down Your Patch Job
Once your patch job has dried, use medium-grit sandpaper to lightly sand down any lumps or bumps in order to get an even finish on your repair work. Once this is done, use a soft cloth or brush to wipe away any dust created by sanding.
4. Prime and Paint
After everything is wiped away, apply primer over the area where you patched up the hole (unless you are using pre-colored wood filler). You may need several coats of primer depending on how much of it was used when filling in the hole.
After the primer has dried completely, apply two coats of paint to match your existing paint color (or pick out a new one if desired). Allow each coat of paint 24 hours for drying time before applying another coat.
Tips to Fix a Hole in a Wood Door
1. Find the source of the hole
If the hole is small, it might just be a case of the door knob hitting the door too hard. In this case, simply moving the door knob slightly to the left or right should do the trick. If the hole is bigger, then it might be due to a loose screw or hinge. In this case, you will need to tighten or replace the screw or hinge.
2. Sand down the area around the hole
Once you have found the source of the hole, sand down the area around it with a fine-grit sandpaper. This will help to create a smooth surface for the repair.
3. Applying wood filler to the hole
Use a putty knife to apply wood filler to the hole. If you are using a water-based wood filler, make sure to dampen the area around the hole first so that the filler will adhere properly. Allow the filler to dry completely before proceeding to the next step.
4. Sand down the area again
Once the wood filler has dried, sand down the area again with fine-grit sandpaper until it is smooth.
5. Apply a coat of primer to the area
Apply a coat of primer to the area with a brush or roller. Make sure to follow all manufacturer’s instructions on how long you should wait for the primer to dry before proceeding to paint.
6. Paint over the primer with your chosen paint color
Paint over the primer with your chosen paint color. Make sure to use paint that is suitable for use on doors and follow all manufacturer’s instructions on how long you should wait for each coat of paint to dry before applying additional coats.
How to Protect a Wooden door from getting a hole?
While wooden doors provide an aesthetically pleasing look to any room, it’s important to protect them from being damaged by physical force or weather. An important step in protecting a wooden door is to use a single coat of paint to cover the surface.
This will help increase its durability and keep it looking beautiful for years to come. Additionally, regular cleaning and polishing of the door can help maintain its condition.
Check it frequently for signs of wear, cracks, or splintering wood, and address these problems as soon as possible.
Adding weather strips around the edges will help keep excess water out and decrease the chance of rot or warping that may lead to a hole being created in the door.
Taking proactive measures like these will go a long way in keeping your wooden door looking great and working properly over time.
Conclusion
Fixing holes in wooden doors doesn’t have to be difficult! With these simple steps, your door will look good as new in no time at all. Just remember that patience is key you don’t want to rush through any of these steps because it could lead to an uneven surface later on down the line.
That being said, once you’ve followed these instructions carefully and allowed adequate drying time between each step, you should find a repaired wooden door that looks nearly perfect! Good luck!
FAQs
Cost to Fix a Hole in a Door?
Patching a hole in a door can be an easy, inexpensive fix for the average homeowner. The cost of supplies needed to repair the hole will depend on what kind of door you have. For interior doors, you’ll need wood putty and paint to cover up the repair.
For exterior doors, you may need fiberglass mesh tape, concrete, and some sealant, a material that is available at most home improvement stores to keep moisture out. In addition to purchasing any needed materials, you might also want to consider hiring a handyman or professional contractor to assist with the job, especially on exterior doors which can start around $50-$80 an hour.
All said repair costs can range anywhere from a few dollars if you’re supplying the labor yourself up to more in-depth repairs requiring professional help that can total around $100 or higher.
How Do You Repair a Solid Wood Door?
Repairing a solid wood door is a straightforward task, yet can take some time and effort to ensure the repair is done properly. The first step is to assess the damage, as this will determine what type of repairs are needed and the tools necessary.
Next, all the hardware should be removed from the door such as hinges and handles. This will make it easier to apply any necessary adhesive or filler materials. Depending on the extent of damage, filler materials or wood putty should be used if there are any cracks or chips in order to fill them.
Then it is important to lightly sand down any uneven surfaces so that they are smooth and ready for primer painting if desired. Finally, reattach any hardware and use a brush or cloth to apply a coat of sealant over the top of the wood door; this helps protect it against future scratches or damage.
How To Patch a Hollow Door?
Hollow core doors are an affordable and lightweight type of door commonly used in residential buildings. Because of their thin construction, hollow core doors can be prone to damage and dents. Fortunately, there is an easy way to patch a hollow door! To start the process, use a wood filler or wood putty to cover any holes or gaps on the surface of the door.
Once it’s dry, lightly sand the area around the patch until it’s even with the rest of the door. Then apply a coat of paint that best matches your existing door color. With these easy steps, you can repair an unsightly hole in your hollow core door quickly and without breaking your budget!
How do you fix nail holes in a wooden door?
One of the quickest and most cost-effective ways to fix nail holes in a wooden door is to use a wood filler. This type of product is designed to fill small cracks, knots, and defects in wood. For best results, ensure that the wood filler you use matches the color of your door or apply paint to the door after application.
When applying the product, first clean out any existing debris or dust from the nail holes before filling them in with the filler. Let it dry completely and then finish off by sanding it down with fine-grit sandpaper. You should now have a beautiful look with no sign of nail holes!